Mar 09 2017

Move RDS profiles to Another Volume/Drive

Published by under Windows

You’re in charge of a Remote Desktop Services (RDS) server but unfortunately, the C: drive starts running out of space, user profiles being on that same volume.
Lucky enough, a huge amount of space remains on the D: drive, but how shall I move RDS profiles?

Set Path for New Profiles

You can set up a GPO that creates new profiles on the D: drive like this:

-> Computer Configuration
-> Administrative Templates
-> Windows Components
-> Remote Desktop Services
-> Remote Desktop Session Host
-> Profiles
-> Set path for Remote Desktop Services Roaming Profiles
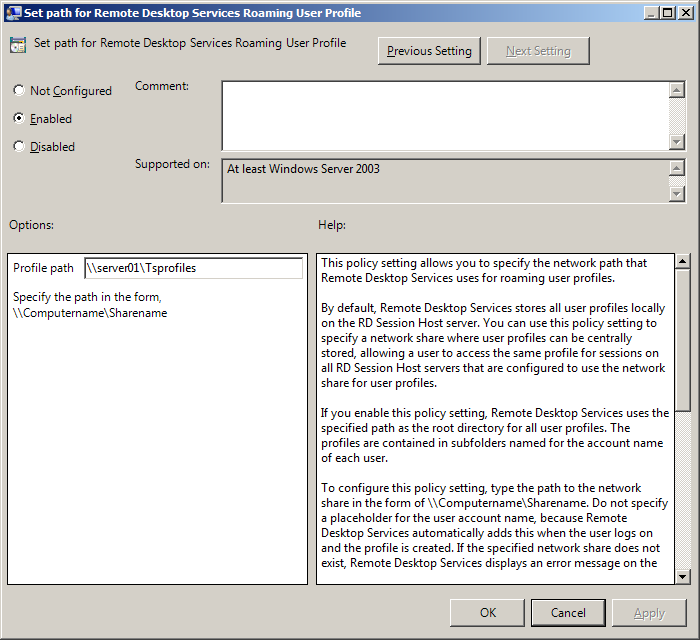
Remote Desktop Services profile path


This is working for new profiles but older ones need to be moved.

Move Existing Profiles

– Migrate user folder from C: to the new drive and assign proper rights.

If older profiles connect with a temporary profile, you should also:
– Remove the entry in
-> Control Panel
-> User accounts
-> Configure user profiles advanced properties.
– Remove the registry entry HKLM\Software\Microsoft\Windows NT\CurrentVerison\ProfileList\S-1-5-21… with a ProfileImagePath key matching the user profile path
Advantage: All new profiles will create in this new location.

or

Edit the path in the above registry key, move the profile folder to the new location and assign user’s rights.
New profiles will still be created on C: but you can migrate some on D: as you wish, and spread data on 2 volumes.

The best is clearly to define a GPO right from the start on a dedicated volume other than C:. If not you will have to move RDS profiles sooner or later.


No responses yet

Oct 06 2016

Processing CSV Files with Perl and Bash

Published by under Linux


Olivier, a friend of mine, had to parse a CSV file and took the opportunity to benchmark the performance of 3 programming languages.
 
The file contains server names and disks he needs to add up into a hash table in order to get the total disk space for each server. He assumes on his blog Perl, Python and Golang are much faster than Bash. He is definitely right but, how much faster?
 
The following (slightly modified) Perl script processed 600k lines in less than a second. Not bad knowing Perl is an interpreted language.

#!/usr/bin/perl
my $file = 'sample.csv';
my %data;
open(my $fh, '<', $file) or die "Can't read file '$file' [$!]\n";
while ( my ($server,$value)=split(/,/,<$fh>)) {
    $data{$server} += $value;
}
close ($file);

 
Now, here’s a similar code in bash

#!/bin/bash
file=sample.csv
declare -A data
while read -r line; do
  values=($(echo $line|awk -F, '{print $1" "$2}'))
  (( data[${values[0]}] += ${values[1]} ))
done < "$file"

The file was processed in over 19 minutes, or in other words, around 1200 times slower!
 
Let's see if we can improve the script's performance.
The read command man page states something of interest:
"The characters in IFS are used to split the line into words".
Setting comma as the default separator allows to build the $line variable as an array, saving the hassle of parsing each line and using a temporary variable.

#!/bin/bash
IFS=','
file=sample.csv
declare -A data
while read -a line; do
  (( data[${line[0]}] += ${line[1]} ))
done < "$file"

This new version runs in the smooth time of... 17s! This is 17 times slower than Perl, but 70 times faster than the original version.
 
No doubt Perl and Python are much faster than the shell family languages, but one needs to pay attention to small details when it comes to performance issues.


No responses yet

Oct 02 2016

Double Microsoft Exchange and Mail Relay on a Remote Site

Published by under Exchange

You have an Exchange server (or cluster) that communicates to the outside world through a mail relay (also called smarthost in Microsoft terminology), usually in a DMZ. You’d now like to give some high availability to this infrastructure, that could ideally cover a disaster recovery plan. This can be achieved doubling servers on a second site – siteB – in case something goes wrong on site A, meaning a relay on each site, with its own Internet connection.


Secure Incoming Mail Traffic

I use Symantec Messaging Gateway for mail relay: it is powerful, easy to configure, and can be set up as a virtual machine. It also comes at no additional cost if you have already purchased Symantec antivirus licenses. You can use any other mail gateway indeed.
 
Routing incoming mail is only a matter of creating DNS MX records for each mail relay and forwarding mail to Exchange servers. External mail servers will automatically fail back to the second mail relay if they cannot reach the first.


Outgoing Traffic Failover

Routing mail to the outside is a bit more complicated.
If you add a 2nd mail gateway to the Exchange send connector, it will load balance emails over the 2 relays wether they’re up or not, and will not fail over. But there is a way.
 
Create a DNS entry for each smarthost, in their own subdomain:
SiteA: RelayA.siteA.mydomain.com
SiteB: RelayB.siteB.mydomain.com
These could be aliases indeed pointing to real hostnames.
 
Then, create 2 MX records for siteA subdomain that point to the previous entries. The local relay having a lower number (higher priority):

siteA.mydomain.com.	3600	IN	MX	5  relayA.siteA.mydomain.com.
siteA.mydomain.com.	3600	IN	MX	10 relayB.siteB.mydomain.com.


Do the same for siteB if there’s also an Exchange server on the site.
 
All you need to do is create a send connector pointing to siteA.mydomain.com. Before resolving the DNS hostname for sitea.mydomain.com, Exchange will first attempt to do an MX lookup, even though this is not clearly stated in Exchange EAC.
 

Exchange smart host mail relay


With this flexible solution, you have loads of possible setups. You could:
– Send traffic to the local relay and fail over to the remote site
– Load balance the traffic on the 2 sites and fail over if one goes down (setting the same MX priority)
– Load balance the traffic on 2 local mail relays and failover to a single remote (two equal high priority MX and a lower for the remote relay)


Conclusion

All is fully automated if a relay becomes unreachable and new relay hosts are managed through DNS. You have now a redundant architecture with high availability.


No responses yet

Sep 24 2016

Reuse PFX Exchange / IIS Certificate on Apache Web Server

Published by under Apache,Exchange,Mail

While generating a Microsoft Exchange (or IIS web server) certificate, take the opportunity to add extra domain names and reuse it on Apache web servers. This will save you a few bucks and time, unless the CA provides a certificate for multiple platforms.

PFX certificate on Apache
Mmh30 / Pixabay

PFX is a popular exchange format on Microsoft software such as Exchange or IIS. It is a PKCS#12 archive file that contains a certificate and the matching private key. It could also include other things like the CA certificate.
First off, copy the pfx file generated with Exchange on the web server where you should have all the tools that you need to extract and import the PFX certificate on Apache.


Extract Cert and Key from the PFX File

Extract the private key from the PFX. Enter the password if asked.

openssl pkcs12 -in cert.pfx -nocerts -out enc.key -nodes


Now, extract the certificate

openssl pkcs12 -in cert.pfx -nokeys -out cert.crt


And finally, decrypt the private key

openssl rsa -in enc.key -out dec.key


Import Cert and Key into Apache

 
Move certificate and private key to Apache appropriate directories (I’m on Linux Redhat), and give proper permissions

mv cert.crt /etc/pki/tls/certs/
mv dec.key /etc/pki/tls/private/
chmod 600 /etc/pki/tls/private/dec.key

Failing to run chmod leads to an Apache error on restart.
 
If selinux is enabled on your web server, run

restorecon -RvF /etc/pki

This will restore the proper permissions on the new files you just copied over. You will get the following error message if you don’t:
[error] (13)Permission denied: Init: Can’t open server certificate file /etc/pki/tls/certs/dec.key
 
Declare the new certificate in the Apache virtual host configuration file:
SSLCertificateFile /etc/pki/tls/certs/cert.crt
SSLCertificateKeyFile /etc/pki/tls/private/dec.key

 
And reload the daemon to apply changes:

/etc/init.d/httpd reload

 
Now you have the same certificate on Exchange (or IIS in a PFX archive) and Apache web server. The certificate could be used on other web servers such as Nginx for instance.

Also check with your certification authority beforehand. They may provide multiple certificate formats for different pieces of software, saving you the hassle of running these commands.


No responses yet

Aug 25 2016

List AS400 User Profiles and their Default JOBQ

Published by under AS400

I want to do a bit of cleanup on our main IBM i because users jobs are running in all sort of queues. Most users have a dedicated JOBD and JOBQ, which is wrong in my humble opinion. A user’s JOBQ is defined within the user’s JOBD (Job Description). A JOBD references a JOBQ and can be assigned to as many users as you wish. The first thing I would need is a list of everybody’s default JOBQ.

I can get the job descriptions easily with the WRKUSRPRF command but getting all job queues at once is trickier.
If you’re familiar with PASE, it’s easy to get the job done and even assign new JOBDs to profiles based on their current value.


JOBD/JOBQ List by User Profile

Connect to PASE environment either running ‘CALL QP2TERM’ or SSH if the service is set up and running.
Copy the following shell code into a file (let’s call it listJobq.sh) in the IFS, on your home directory for instance, make it executable
chmod +x listJobq.sh

and run:
./listJobq.sh

#!/QOpenSys/usr/bin/ksh

IFS='
'
# Make sure the ADMIN library exists or use another
system "DSPUSRPRF USRPRF(*ALL) OUTPUT(*OUTFILE) OUTFILE(ADMIN/USERLIST)"

printf "%11s%11s%11s\n" "USRPRF" "JOBD" "JOBQ"

for i in $(db2 "select upuprf,upjbds from ADMIN.USERLIST" | \
      sed -e '1,3 d' -e '/^$/ d' | sed -e '$ d'); do
  unset IFS
  set -A user $i
  jobq=`system -i "DSPJOBD JOBD(${user[1]})" | awk '/^ Fi/ {print $NF;exit;}'`
  printf "%11s%11s%11s\n" "${user[0]}" "${user[1]}" "$jobq"
done

 
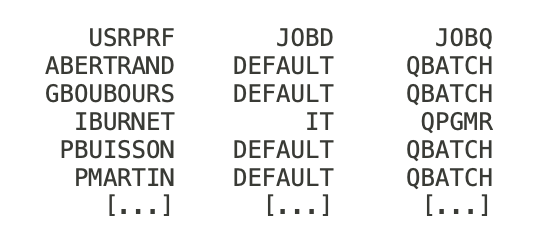
This generates a list of USRPRF / JOBD / JOBQ. Most profiles now use the DEFAULT JOBD which sends users’ jobs to the QBATCH JOBQ if not defined otherwise.

AS400 users profile default JOBQ list


The system may return a “db2: cannot execute” or “/usr/bin/db2: Permission denied” message. In this case, create a symbolic link like this:
ln -s /QOpenSys/usr/bin/qsh /QOpenSys/usr/bin/db2
The reason lies in this explanation.


Bash Script Optimisation on PASE

The downside is the “system” command slowness. -i speeds things up a bit but it’s still not quick enough. If you have installed the OPS (Open Source) package from IBM along with matching PTF and bash, you can try this optimised version with hash tables in bash. Opensource packages can now be managed from the IBM i ACS user interface, which is very handy.
It stores jobd/jobq in a hash table that acts as a cache since a jobd definition always returns the same job. If a lot of users have the same JOBD, it can be very efficient (35 times quicker in my case). This is a trick to get better performance for shell scripts on IBM i that are still running slow compared to x86 servers.
 

#!/usr/bin/bash

IFS='
'
declare -A JOBQ

# Make sure the ADMIN library exists or use another
system "DSPUSRPRF USRPRF(*ALL) OUTPUT(*OUTFILE) OUTFILE(ADMIN/USERLIST)"

printf "%11s%11s%11s\n" "USRPRF" "JOBD" "JOBQ"

for i in $(db2 "select upuprf,upjbds from ADMIN.USERLIST" | \
      sed -e '1,3 d' -e '/^$/ d' | sed -e '$ d'); do
  unset IFS
  # Sets username and jobd in user[0] and user[1]
  user=($i)
  # Add jobq to hash table
  if [ -z ${JOBQ[${user[1]}]} ]; then
    jobq=`system -i "DSPJOBD JOBD(${user[1]})" | awk '/^ Fi/ {print $NF;exit;}'`
    JOBQ[${user[1]}]=$jobq
  fi
  printf "%11s%11s%11s\n" "${user[0]}" "${user[1]}" "${JOBQ[${user[1]}]}"
done
 

No responses yet

« Prev - Next »