Aug 01 2007

Gigawords Support in Freeradius

Published by under Cisco,Freeradius

Some people using Radius for accounting don’t know there are counters limits. Values defined in the protocol are stored in 32 bit fields meaning you will never go any higher than 4294967296 bits, that is fairly more than 4GB. If a session stays up for days, there are good chances that the counter resets to 0 and some traffic will go missing. Yet, some extensions have been added to the protocol to support bigger amount of traffic. Since Freeradius 1.1.7, Gigawords with a Mysql backend are supported by default. It is highly recommended to upgrade to the last version. While upgrading, do not forget to update your database schema as in mysql.sql changing AcctInputOctets and AcctOutputOctets from 32 to 64 bits. This article deals with those having Freeradius prior to 1.1.7.


Before You Start

We assume you have a working Freeradius setup with Mysql to store your data. We also assume that your Network Access Server (NAS) supports gigawords as defined in RFC2869. It is usually the case for Cisco routers but check the manual of your NAS to know how to activate it.


Enabling Gigawords on NAS

Again, this section relates to Cisco but a similar set of commands is usually available on most devices. Gigawords option is enable by default on Cisco gear hence it doesn’t appear in the configuration. If it does, simply run this command to activate it:

   aaa accounting gigawords


You will be asked to reload the router to apply the new settings. This will activate Acct-Input-Gigawords and Acct-Output-Gigawords attributes which tell how many times the counters reset. Knowing this, we can then calculate the real values. Next step is to create extra column in the database.


Mysql Table Modification

AcctInputOctet and AcctOutputOctet fields need to be changed from 32 to 64 bits. You can make the change with any Mysql client or PhpMyAdmin

   ALTER TABLE radacct CHANGE AcctInputOctets AcctInputOctets BIGINT(20) UNSIGNED;
   ALTER TABLE radacct CHQNGE AcctOutputOctets AcctOutputOctets BIGINT(20) UNSIGNED;


Freeradius Update

The SQL code in sql.conf needs to be change for stop and update queries to log the new values into the database. Here’s what they look like after modification:

   accounting_update_query = "
     UPDATE ${acct_table1}
     SET AcctInputOctets = '%{Acct-Input-Gigawords:-0}' << 32 | '%{Acct-Input-Octets:-0}',
       AcctOutputOctets = '%{Acct-Output-Gigawords:-0}' << 32 | '%{Acct-Output-Octets:-0}',
       FramedIPAddress = '%{Framed-IP-Address}'
     WHERE AcctSessionId = '%{Acct-Session-Id}'
       AND UserName = '%{SQL-User-Name}'
       AND NASIPAddress= '%{NAS-IP-Address}'
       AND NASIPAddress= '%{NAS-IP-Address}'
       AND AcctStopTime = 0"

   accounting_stop_query ="
     UPDATE ${acct_table2}
    SET AcctStopTime = '%S',
       AcctSessionTime = '%{Acct-Session-Time}',
       AcctInputOctets = '%{Acct-Input-Gigawords:-0}' << 32 | '%{Acct-Input-Octets:-0}',
       AcctOutputOctets = '%{Acct-Output-Gigawords:-0}' << 32 | '%{Acct-Output-Octets:-0}',
       AcctTerminateCause = '%{Acct-Terminate-Cause}',
       AcctStopDelay = '%{Acct-Delay-Time}',
       ConnectInfo_stop = '%{Connect-Info}'
     WHERE AcctSessionId = '%{Acct-Session-Id}'
       AND UserName = '%{SQL-User-Name}'
       AND NASIPAddress = '%{NAS-IP-Address}'
       AND AcctStopTime =0"


Restart Radius service, you’re done!

This concatenates the Gigawords and Octets values adding 32 null bits to the first and doing a logical OR on them.
If you have any comment or want to share some suggestions you may have, feel free to contact us.

This solution was provided on the Freeradius FAQ available at http://wiki.freeradius.org


9 responses so far

Jun 11 2007

Mysql Traffic Encryption with OpenSSL

Published by under Freeradius,Mysql


This is related to Freeradius software but can be applied to any application that needs to encrypt Mysql traffic. Freeradius is compliant to Radius protocol characteristics, which give ability to accomplish various actions, such as authenticate users. Number of caveats have been found, not related to the software but to the protocol. Joshua Hill from the laboratory Infogard has realised a very good analyse available on the web at http://www.untruth.org/~josh/security/radius/. This document relates possible attacks while sending login and password for authentication.
We won’t detail Radius protocol issues, but try to avoid some security problems when using a database system as a backend. Access to the Radius database must be secure of course, but the data transport from the Freeradius server also. This is really convenient when both servers are distant, which can be frequent with networks of big size. We propose to encrypt Mysql traffic with OpenSSL, the wildly used SSL engine, in these conditions.

OpenSSL Installation

OpenSSL can be downloaded from the official site. This test has been realised with the last stable version available today, 0.9.8e. It can be installed as follow:

./config –prefix=/usr/local/openssl shared zlib
make
make test
make install

“zlib” activates support for compression/decompression and “shared” for shared libraries. It’s important to note compiling Mysql will fail on a Linux plateform without the “shared” option.

New libraries must be included in the path then. Add path /usr/local/openssl/lib (or any other where you’ve installed OpenSSL) in the /etc/ld.so.conf file under Linux. Run command line ldconfig to make the new path active.

OpenSSL activation on the server

Mysql libraries are usually provided with YaSSL, to replace OpenSSL, limited by its license. (Re)compilation is then necessary:

./configure –enable-openssl=/usr/local/openssl
make
make install

To check wether Mysql server supports SSL after service restart, we need to examine the value of the system variable have_openssl like this:

mysql> SHOW VARIABLES LIKE 'have_openssl';
+---------------+----------+
| Variable_name | Value    |
+---------------+----------+
| have_openssl  | DISABLED |
+---------------+----------+

If the value is “DISABLED”, the server supports SSL connections but wasn’t started with the correct options. Certificates needed for encryption must be created.

cd /usr/local/mysql
mkdir openssl && cd openssl
mkdir certs && cd certs

CA certificate generation
openssl genrsa -out ca-key.pem 2048
openssl req -new -x509 -nodes -days 1000 -key ca-key.pem -out ca-cert.pem

Answer questions with appropriate data.
Openssl commands generate a 2048 bit key and a certificate valid for a thousand day period.

Server certificate generation
openssl req -newkey rsa:2048 -days 1000 -nodes -keyout server-key.pem -out server-req.pem
openssl x509 -req -in server-req.pem -days 1000 -CA ca-cert.pem -CAkey ca-key.pem -set_serial 01 -out server-cert.pem

Client certificate generation
openssl req -newkey rsa:2048 -days 1000 -nodes -keyout client-key.pem -out client-req.pem
openssl x509 -req -in client-req.pem -days 1000 -CA ca-cert.pem -CAkey ca-key.pem -set_serial 01 -out client-cert.pem

Certificates related data must be given as parameters while launching the service. They can also be specified in Mysql configuration file /etc/my.cnf in section [mysqld].

ssl-ca=/usr/local/mysql/openssl/certs/cacert.pem
ssl-cert=/usr/local/mysql/openssl/certs/server-cert.pem
ssl-key=/usr/local/mysql/openssl/certs/server-key.pem

Having restarted Mysql, SSL encryption should be available:

mysql> SHOW VARIABLES LIKE 'have_openssl';
+---------------+-------+
| Variable_name | Value |
+---------------+-------+
| have_openssl  | YES   |
+---------------+-------+

As for now, the server accepts secure connections. It’s still possible to connect in clear mode as the choice is made on a per connection basis. It is possible to force a user to connect only in secure mode. This option resides in the user’s parameters and can be changed with the GRANT command.

OpenSSL activation on the client

There are several ways to connect to the server in SSL mode. Certificates are either given in option while launching Mysql client, or can be read from the configuration file /etc/my.cnf (or any other as we can modify the default file like this: mysql –defaults-file=my.cnf). Consequently, add these lines in the [client] section:

ssl-ca=/usr/local/mysql/openssl/certs/cacert.pem
ssl-cert=/usr/local/mysql/openssl/certs/client-cert.pem
ssl-key=/usr/local/mysql/openssl/certs/client-key.pem

After being connected, the cipher used to encrypt data can be displayed:

SHOW STATUS LIKE 'Ssl_cipher';
+---------------+--------------------+
| Variable_name | Value              |
+---------------+--------------------+
| Ssl_cipher    | DHE-RSA-AES256-SHA |
+---------------+--------------------+

In the case where Freeradius is the client, the number of SSL connections should rise with the same number of connections created in the pool, as defined in file sql.conf.

show status like 'Ssl_accepts';
+---------------+-------+
| Variable_name | Value |
+---------------+-------+
| Ssl_accepts   | 52    |
+---------------+-------+

Performance Impact

Data encryption has of course an impact on performance as the operation is greedy in CPU and network usage. Here is a graphical visualisation of the number of transactions processed per second with and without encryption

Impact SSL sur les performances Mysql

These tests have been realised with a machine on which were running both Radius and Mysql services. They give however a good appreciation of encryption impact on performance that is around 30% slower.


No responses yet

May 07 2007

Mysql or Postgres for Freeradius?

Published by under Freeradius,Mysql,Postgresql

We are not trying to build a full comparative of Mysql and Postgresql in this article. This subject has been discussed many times and everyone has his own opinion on this. Some directions may be given and only a few critirias will be analysed to be used with Freeradius.


Criteria

If we check what’s already been done to compare Mysql and Postgresql, many criterias could be considered. The database containing Freeradius records is very simple, contains neither transactions, nor triggers, nor views. What should Freeradius database offer? This answer to this is pretty simple as well: disponibility and speed will be key factors to take a decision.

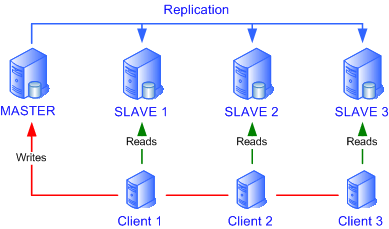
Mysql and Postgresql both offer some solutions – similar – to answer to needs of applications requiring high disponibility. Replication seems to be a good choice as it is possible to specify different servers for accounting and authentication (writes and reads in other words). Write accesses can be sent to the Master and reads to the slaves.

As both databases offer high availability options, the choice will be made based on the queries speed. Mysql is popular for its speed (especially for reads) but others will mention that Postgresql robustness in a concurrential environment would be better.


Tests

We are going to try to determine the number of transactions that each database is able to perform in a given time. Results will be compared to a basic setup that gets usernames from a text file. Conditions will be strictly identical. Among others:

  • They will run on the same machine: a Pentium II with 384M RAM
  • Mysql and Postgresql are compiled with the same compiler and equivalent options (Let’s mention flag -O3)
  • Tables structure contains identical indexesSQL code (taken from Freeradius documentation) can be found here for Mysql and Postgresql.
  • Pools of 50 connections are created

We measure the execution time to authenticate 50000 users with the radclient tool in concurrent access.

time /usr/local/bin/radclient -p 1000 -q -s -f radius.test 127.0.0.1 auth test


Results are pretty amazing:

StorageText FilePostgreSQLMySQL
Time5’13.552”1’46.598”0’35.146”
transactions/s1594691422


Here is a graphical visualisation of the number of transactions processed per second.

Performance

Reading from Postgresql as well as Mysql, is much faster than in a text file. This can be explained by indexes creation within tables. This difference would be smaller and could even be the other way around for a database containing a much smaller number of users.

Mysql realises excellent results processing three times more transactions than Postgresql.


Conclusion

These performance tests should not be interpreted as such, as users logging with an incorrect password are not considered. Some other aspects are not taken in considerations. Let’s mention the time spent accounting, pre and post-authentification processes. Nevertheless, results would be pretty close to these in a Master-Slave environment where reads would be sent to another server than writes.


No responses yet

Apr 18 2007

Mysql Failover

Published by under Mysql


Important note:
Heartbeat is now obsolete and has moved to a new stack available on Clusterlabs. For simple high availability project using a virtual IP, try out keepalived that does monitoring and failover with just a simple configuration file.

When a Mysql server contains critical data, it’s always a good idea to rely on more than one server.
Implementing a cluster would be ideal in this situation and could offer a high availability setup.
It gives the option to replace a node if it fails with no disruption of service or even data loss.
The fact is it becomes much less interesting financially considering a minimum of 4 machines is required, and a lot of time as well.
I’d rather have a replication setup but a manual fix needs to be done to switch the traffic from the master to the slave. This article gives the ability to switch the traffic automatically.

Initial Setup

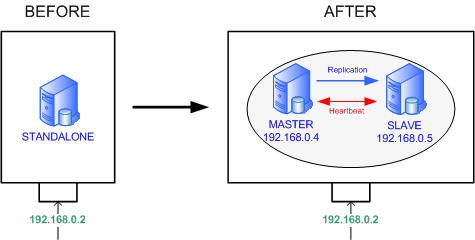
Let’s assume we have a standalone server server running on 192.168.0.2
After modification, the live server will take IP 192.168.0.4
A slave will be added with IP 192.168.0.5
192.168.0.2 becomes the virtual IP of the “cluster”. Changes are transparent to the programs connecting to the database. They will still use IP 192.168.0.2 as originally written.

Failover
  • Mysql replication needs to be implemented with the following settings:
    Master 192.168.0.2
    Slave 192.168.0.5
    The master keeps the original IP – for now – so all applications still connect to the same machine.
    Check this other tutorial about replication here.
  • Firewalls updates
    Apply the master’s rules on the slave ie 192.168.0.5 identical to 192.168.0.2 so each single program can connect to the slave if requested.
    This method could be used to implement load-balancing in a quick and easy way.
    Allow all traffic between master and slave. This is important to get Heartbeat and Mon to check services, as well as the Mysql replication protocol.
  • Disable Selinux on the 2 machines
    It creates problems with heartbeat
    In /etc/selinux/config
    set “SELINUX=disabled”
    Changes need unfortunately a server reboot to be applied

Heartbeat

Download and install heartbeat from the Linux high availability project website at http://www.linux-ha.org/Heartbeat.
RPMs are available for Fedora Core.
sudo yum install heartbeat

Configuration files are located in /etc/ha.d/. You need to create those 3 files on the two servers:

cat > /etc/ha.d/authkeys
auth 1
1 crc

Set appropriate rights to the file

chmod 600 /etc/ha.d/authkeys
cat > /etc/ha.d/haresources
master 192.168.0.2 mysqld mon

haresources must contain the virtual IP.

cat > /etc/ha.d/ha.cf
logfile /var/log/ha-log
keepalive 2
# the time to wait before declaring a node to be dead
deadtime 10
# this is the time before heartbeat will start the resources the first time it starts ie mon,mysql...
initdead 20
bcast eth0
node master.mydomain.com
node slave.mydomain.com
# Set this to "on" only if you have a multi-master setup
auto_failback off
# will ping the default gateway to check the network connectivity
ping 192.168.0.1
respawn hacluster /usr/lib64/heartbeat/ipfail

Note Nodes should be literally taken from `uname -n`. This is fairly important or heartbeat won’t work.

Note /etc/hosts file on BOTH machines should contain entries for the 2 hosts
192.168.0.4 master.mydomain.com
192.168.0.5 slave.mydomain.com

Note /usr/lib64/heartbeat/ipfail is for a 64 bit-architecture. Remove ’64’ if you’re on a 32.

Mon

Download MON

cd /usr/local/src
wget ftp://ftp.kernel.org/pub/software/admin/mon/mon-0.99.2.tar.gz

Check if a new version is available on http://www.kernel.org/software/mon/. 0.99.2 was the most recent stable version when I last checked.
Uncompress the tarball and move it to /usr/local or your usual favourite location

tar xvfz mon-0.99.2.tar.gz
mv mon-0.99.2 /usr/local/mon

Copy the configuration directory to /etc

mv /usr/local/mon/etc /etc/mon

Install Perl and the modules that Mon requires

- DBI
- DBD::mysql
- Time::Period
- Time::HiRes
- Convert::BER
- Mon::Client

Modules can be found on the CPAN website at http://www.perl.com/CPAN/modules/index.html.
Download and install the appropriate packages following instructions given in INSTALL. Usually:

gunzip  <module>.tar.gz
tar -xvf  <module>.tar
cd <module-dir>
perl Makefile.pl
make
make test
make install

or via

perl -MCPAN -e shell

and run

install <module>

Note Make sure Mysql libraries are in the path before installing DBD::mysql.

Create the Mon configuration file

cat > mon.cf
alertdir   = /usr/local/mon/alert.d
mondir     = /usr/local/mon/mon.d
statedir   = /usr/local/mon/state.d
maxprocs    = 20
histlength = 100
randstart = 60s
# Virtual IP
hostgroup mysql_servers 192.168.0.2
watch mysql_servers
  mysql
    ## Mon will do a test on Mysql port every 60 seconds
    interval 1m
    monitor mysql.monitor
    period wd {Mon-Sun}
      alert bring-ha-down.alert
      alert mail.alert -S "Host1 MYSQL is down" admin@example.com
      upalert mail.alert -S "Host1 MYSQL server is back up" admin@example.com
      alertevery 600s
      ## Sends an alert after 3 failures
      ## ie 2mn
      alertafter 3

Create a script to bring heartbeat down if Mysql service becomes unavailable

cat > /usr/local/mon/alert.d/bring-ha-down.alert
/etc/rc.d/init.d/heartbeat stop

Change the script’s name to activate mysql mode by default

cd mon.d
mv msql-mysql.monitor mysql.monitor

Create a user authorized to access the test database

mysql> GRANT ALL PRIVILEGES ON test.* TO alive@'%' IDENTIFIED BY 'mypassword';

Edit mysql.server accordingly and add a line to connect to the ‘test’ database

$options{database} ||= "test";

This option was missing in my default configuration file.

Create a startup script for mon. Here’s a sample:

cat > /etc/rc.d/init.d/mon
#!/bin/bash
MON_HOME=/usr/local/mon
case "$1" in
    start)
        if [ -f $MON_HOME/mon.pid ]; then
                echo "mon already started"
                exit
        fi
        echo "Starting Mon"
    $MON_HOME/mon -c $MON_HOME/mon.cf -L $MON_HOME -P $MON_HOME/mon.pid &
        ;;
    stop)
    if [ -f $MON_HOME/mon.pid ]; then
    echo "Stopping Mon"
        kill -9 `cat $MON_HOME/mon.pid`
        rm  -f $MON_HOME/mon.pid
    else
        echo "no server pid, server doesn't seem to run"
    fi
    ;;
    *)
    echo "Usage: $0 {start|stop|status|reload|restart}"
    exit 1
esac
exit 0

Make it executable
chmod 755 /etc/rc.d/init.d/mon

Run Applications

Make sure Mysql is running on the 2 boxes and replication is up-to-date before doing anything else.
Change the Master’s IP to 192.168.0.4 in the config files and restart the 2 servers (master first).
Fire up Mysql and Heartbeat on the master
/etc/rc.d/init/mysqld start
/etc/rc.d/init.d/heartbeat start

# You can check hearbeat logs in /var/log/ha-log
The virtual IP will be assigned to eth0:0 after a few seconds
This can be checked with `ifconfig`

eth0:0    Link encap:Ethernet  HWaddr 00:13:72:5D:1D:1F
          inet addr:192.168.0.2  Bcast:192.168.0.255  Mask:255.255.255.0
          UP BROADCAST RUNNING MULTICAST  MTU:1500  Metric:1
          Base address:0xdcc0 Memory:fe6e0000-fe700000

If you experience problems, check messages for Mon in /var/log/messages as well
Do the same on the slave

You can then try to turn the machine off, disconnect the cable or shutdown Mysql;
The virtual IP will migrate to the second server after 2mn (this time can be reduced in mon.cf 1mn and 3 checks.
It is better to give some time in case Mysql becomes unresponsive for a short period of time while there are traffic spikes)

Some basic load-balancing is now possible redirecting all read commands to the slave (192.168.0.5), leaving the writes to the master.
You need to monitor that the slave is always live in this case though because the failover won’t apply to the reads.


4 responses so far

Apr 01 2007

Mysql Replication

Published by under Mysql


Having a few databases running on Mysql with tables growing to several millions of rows, backups become pretty heavy. If the server fails, it can mean several hours lost, working on setting up a new server and reimporting the data from the backup. I’m not even talking about the potential financial loss due to the downtime. A better reliability can be achieved with Mysql either with a cluster or the replication feature. We will focus on replication in this article. However, this is a quick tutorial on how to setup replication; Check Mysql documentation to get more information about it.
 

Replication

 
The master can replicate to many slaves, to which different web clients can send their requests. Writes always have to be sent to the master. If they were sent to a slave, they wouldn’t be replicated on other servers.
 
Note Replication is asynchrone as the slave needs a small delay to be up to date. This is particularly suited to applications such as datawarehouses.
 

Fail-over

Replication doesn’t provide auto fail-over as it requires a manual intervention. Another article has been written about implementing failover with Heartbeat. It provides the ability to switch automatically to the slave server within seconds.
 

Getting started

We’ll assume a standalone server is already running with the precious data, and redundancy needs to be implemented. Proceed to the following steps to get your server ready fr replication:

  • Activate binary log on the master server. This is absolutely needed, the slave reads the binary logs to synchronize. my.cnf contains log-bin=mysql-bin in the [mysqld] section in my case
  • Add server-id=1 in my.cnf.
    This id should be unique for each server (The slave will be 2). Restart the server if those options were not activated.
  • Create an account for the slave on the master that’s only allowed to replicate:
    GRANT REPLICATION SLAVE ON *.*
    TO 'slave'@'192.168.0.3' IDENTIFIED BY 'mypassword';

    where ‘slave’ is the username the slave server is going to connect with, 192.168.0.3 the IP address of the slave.

  • Setup a new machine for the slave server and install Mysql. my.cnf should contain the following:
    [mysqld]
    server-id=2
    . Don’t start the service yet!


Transfer data accross to the slave

  • First block write operations on the master and record the last values from the binary log:
    mysql> FLUSH TABLES WITH READ LOCK;
    mysql> SHOW MASTER STATUS;

     
    You should get a result similar to the following:

    +-------------------+----------+--------------+------------------+
    | File              | Position | Binlog_Do_DB | Binlog_Ignore_DB |
    +-------------------+----------+--------------+------------------+
    | my-db1-bin.000002 |      239 |              |                  |
    +-------------------+----------+--------------+------------------+

     
    Make sure to record those values, they will be needed after starting the slave.

  • Shutdown Mysql process on the master and make a copy of the data directory with tar for example. After the tar was done, restart the process. This is the only time the master will be turned off.
  • Copy the tar file accross to the slave into the temp folder, uncompress it and copy the files to the data directory. Don’t copy the log files.
    Make sure the rights are correct (They should be identical to the original files). You now have the master data on the slave.


Activate Replication on the Slave

Start the slave with the following option:

--skip-slave-start

 
You can also log warnings in the error log to have a better idea of what is going on

--log-warnings

 
Now that the server is started, connect on to it with Mysql client, and add the master’s details:

mysql> CHANGE MASTER TO
mysql> MASTER_HOST='192.168.0.2',
mysql> MASTER_USER='slave',
mysql> MASTER_PASSWORD='mypassword',
mysql> MASTER_LOG_FILE='my-db1-bin.000002',
mysql> MASTER_LOG_POS=239;

 
The last 2 lines contain of course the values that were collected on the master.

mysql> START SLAVE;

 
Replication can start!
The slave status can be checked via the following command:

mysql> show slave status;
+----------------------------+-------------+-------------+-///-+---------------+-------------------+
| Slave_IO_State             | Master_Host | Master_User |     | Connect_Retry | Master_Log_File   |
+----------------------------+-------------+-------------+-///-+---------------+-------------------+
| Waiting for master to s... | 192.168.0.2 | slave       |     |            60 | my-db1-bin.000006 |
+----------------------------+-------------+-------------+-///-+---------------+-------------------+

+---------------------+----------------------+---------------+-----------------------+------------------+
| Read_Master_Log_Pos | Relay_Log_File       | Relay_Log_Pos | Relay_Master_Log_File | Slave_IO_Running |
+---------------------+----------------------+---------------+-----------------------+------------------+
|           514457737 | bak-relay-bin.000007 |      26082745 | my-db1-bin.000006     | Yes              |
+---------------------+----------------------+---------------+-----------------------+------------------+

+-------------------+-///-+---------------------+-----------------+-///-+-----------------------+
| Slave_SQL_Running |     | Exec_Master_Log_Pos | Relay_Log_Space |     | Seconds_Behind_Master |
+-------------------+-///-+---------------------+-----------------+-///-+-----------------------+
| Yes               |     |           514457737 |        26082745 |     |                     0 |
+-------------------+-///-+---------------------+-----------------+-///-+-----------------------+


If replication stops working for some reasons, the last error will be displayed here. This can also find them in mysql error log file.
Disable the –skip-slave-start option from the startup script so replication is activated after a server reboot.


4 responses so far

« Prev - Next »