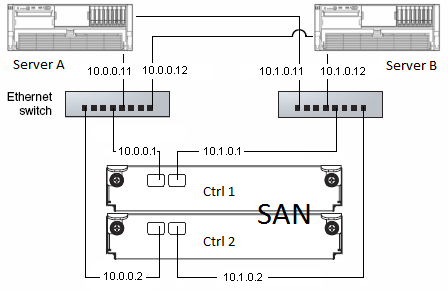
Here are a few steps to configure iSCSI disks on Linux. Although I set this up on a Redhat Enterprise connected to an HP MSA 2012i, the whole configuration remains generic and can be applied to any SAN.
I will add another post to check how both Linux and Windows perform on the same iSCSI device, since there has been a lot of issues reported on the net.
iSCSI Setup
First off, the iscsi tools package is required
redhat $ yum install iscsi-initiator-utils
debian $ apt-get install open-iscsi
Configure the security bit if any applied on the SAN. On Ubuntu/Debian, also set startup to automatic
$ vi /etc/iscsi/iscsid.conf
node.session.auth.authmethod = <CHAP most of the time>
node.session.auth.username = <ISCSI_USERNAME>
node.session.auth.auth.password = <Password>
discovery.sendtargets.auth.authmethod = <CHAP most of the time>
discovery.sendtargets.auth.username = <ISCSI_USERNAME>
discovery.sendtargets.auth.password = <Password>

debian $ vi /etc/iscsi/iscsid.conf
# node.startup = manual
node.startup = automatic
You don’t necessarily have to set a password if the network is secured with vlans or dedicated switches and only yourself connects to the SAN. Authentication adds up another layer of complexity while troubleshooting.
The hostname will appear on the SAN as configured on the server. Originially InitiatorName= iqn.1994-05.com.redhat:2ea02d8870eb, it can be changed to a friendly hostname for a simpler setup.
You can find it in /etc/iscsi/initiatorname.iscsi. If it’s not found, you can set the initiatorName manually.
Now you can start the iscsi service, permanently
$ systemctl enable iscsi
$ systemctl start iscsi
$ systemctl enable iscsid
$ systemctl start iscsid
Targets can be discovered with the iscsiadm command. Running on 1 IP is usually sufficient.
$ iscsiadm -m discovery -t sendtargets -p 10.0.0.1
$ iscsiadm -m discovery -t sendtargets -p 10.0.0.2
You can display them all
$ iscsiadm -m node
10.1.0.1:3260,2 iqn.1986-03.com.hp:storage.msa2012i.0919d81b4b.a
10.0.0.1:3260,1 iqn.1986-03.com.hp:storage.msa2012i.0919d81b4b.a
10.1.0.2:3260,2 iqn.1986-03.com.hp:storage.msa2012i.0919d81b4b.b
10.0.0.2:3260,1 iqn.1986-03.com.hp:storage.msa2012i.0919d81b4b.b
And connect (the service should do that to for you)
$ iscsiadm -m node -T iqn.1986-03.com.hp:storage.msa2012i.0919d81b4b.a --login
Logging in to [iface: default, target:
iqn.1986-03.com.hp:storage.msa2012i.0919d81b4b.a, portal: 10.0.0.1,3260] (multiple)
Logging in to [iface: default, target:
iqn.1986-03.com.hp:storage.msa2012i.0919d81b4b.a, portal: 10.1.0.1,3260] (multiple)
Login to [iface: default, target:
iqn.1986-03.com.hp:storage.msa2012i.0919d81b4b.a, portal: 10.0.0.1,3260] successful.
Login to [iface: default, target:
iqn.1986-03.com.hp:storage.msa2012i.0919d81b4b.a, portal: 10.1.0.1,3260] successful.

$ iscsiadm -m node -T iqn.1986-03.com.hp:storage.msa2012i.0919d81b4b.b --login
Logging in to [iface: default, target:
iqn.1986-03.com.hp:storage.msa2012i.0919d81b4b.b, portal: 10.0.0.2,3260] (multiple)
Logging in to [iface: default, target:
iqn.1986-03.com.hp:storage.msa2012i.0919d81b4b.b, portal: 10.1.0.2,3260] (multiple)
Login to [iface: default, target:
iqn.1986-03.com.hp:storage.msa2012i.0919d81b4b.b, portal: 10.0.0.2,3260] successful.
Login to [iface: default, target:
iqn.1986-03.com.hp:storage.msa2012i.0919d81b4b.b, portal: 10.1.0.2,3260] successful.
Each new iscsi disk should be listed as /dev/sd[a-z], or /dev/mapper. Run “fdisk -l” or “lsblk”. In a 2 controller SAN setup, each device is displayed as 2 separate disks. Read on the Multipath section to configure your device. If the SAN is equipped with a single controller, you can work with your /dev/sd[a-z] straight away (not recommended indeed!).
Multipath
Install the multipath tools:
redhat $ yum install device-mapper-multipath
debian $ apt-get install multipath-tools
As advised on HP website, I set up /etc/multipath.conf as follow. You must check your provider’s website to add your own hardware specific configuration:
blacklist {
        devnode "^(ram|raw|loop|fd|md|dm-|sr|scd|st)[0-9]*"
}
defaults {
        user_friendly_names yes
}
devices {
        device {
                vendor                 "HP"
                product                "MSA2[02]12fc|MSA2012i"
                getuid_callout         "/sbin/scsi_id -g -u -s /block/%n"
                hardware_handler       "0"
                path_selector          "round-robin 0"
                path_grouping_policy   multibus
                failback               immediate
                rr_weight              uniform
                no_path_retry          18
                rr_min_io              100
                path_checker           tur
        }
}
Leaving the device section commented out does not seem to actually apply, so this should work for any NAS as long as you make sure /dev/sd[a-z] devices are not blacklisted.
Turn multipath service on:
redhat $ modprobe dm-multipath
all $ systemctl enable multipathd
all $ systemctl start multipathd
Multipath device mapper will set disks with matching wwid (world wide id) together automatically. Display the multipath topology:
$ multipath -ll
mpath1 (3600c0ff000d8239a6b082b4d01000000) dm-17 HP,MSA2012i
[size=9.3G][features=1 queue_if_no_path][hwhandler=0][rw]
\_ round-robin 0 [prio=2][active]
 \_ 8:0:0:30 sde 8:64  [active][ready]
 \_ 9:0:0:30 sdf 8:80  [active][ready]
mpath0 (3600c0ff000d8239a1846274d01000000) dm-15 HP,MSA2012i
[size=1.9G][features=1 queue_if_no_path][hwhandler=0][rw]
\_ round-robin 0 [prio=2][active]
 \_ 9:0:0:29 sdb 8:16  [active][ready]
 \_ 8:0:0:29 sdd 8:48  [active][ready]
If nothing shows up, run multipath -v3 for debug. Blacklisting is the most common issue on this.
LVM Partitionning
Resulting partitions to work with are listed as /dev/mapper/mpath[0-9] in my case.
I initialize the disk with LVM for ease of use: LVM partitions are hot resizable volumes, let you extend a partition on extra disks, provide snapshot feature, etc… LVM is a must have, if you do not use it yet, start right now!
$ pvcreate /dev/mapper/mpath0
$ vgcreate myVolumeGroup /dev/mapper/mpath0
$ lvcreate -n myVolume -L10G /dev/myVolumeGroup
$ mkfs.ext4 /dev/myVolumeGroup/myVolume
Operations on LUNs
Add a new LUN
Once a new LUN has been created on the SAN, the server does not detect the disk until you do a refresh
$ iscsiadm -m node --rescan
iSCSI disks are now visible, multipath automatically creates the new device.
LUN removal
After unmounting related filesystems, remove LUNs on the SAN and run “multipath -f mpath?” for the desired device
Expand volume
LVM is great as you can resize a physical volume instead of creating a new volume and adding it up in the volume group. Therefore, We stick with a clean configuration on the server and the SAN.
Refresh the disk size
$ iscsiadm -m node --rescan
Check with fdisk -l disk size matches the size on SAN
$ /etc/init.d/multipathd reload
Check with multipath -ll the device size has increased
$ pvresize /dev/mapper/mpath0
The new disk space should now be available. You can then extend the volume with lvresize, -r to resize the filesystem as well.
Load-balancing and Failover
In this setup, traffic is load-balanced on the 2 NICs. If an interface goes down, all the traffic flows through the 2nd link.
I launched a big file copy on to the iscsi disk and turned off one of the interface. The CPU load goes high quick enough and drops as soon as the failover timeout has expired. The copy then fails over on to the 2nd link. Knowing this, set the timeout as small as possible eg 5 sec.
Tags: iSCSI, linux, LVM, multipath, redhat, SAN, Storage

